
Baby "Clayton James" was born Friday, July 23rd.
8lbs. 2oz. 20.5 inches long
Monday, July 26, 2010
Friday, July 16, 2010
Knit Treasures

Look at this hand-knit loveliness... These are treasures that I received in the mail this week from my dear friend, Lynsey. I've never learned to knit and am just amazed at the craftsmanship! That Lynsey is a crafty gal...she actually JUST gave birth to her baby boy about 3 weeks ago, and SOMEHOW found time to make/send these to me!
I can't wait to put them on a little newborn punkin' head and pair of tootsies. Won't these make for sweet newborn photos?
They're made with 100% baby Alpaca wool, and are they ever soft! I told Lynsey that if all baby alpacas are that soft, I want one for my backyard.... ;)

So, "D-Day" is quickly approaching, as we are discussing induction with the doctor for next week, just 'cause I'm ready and we make some big baby boys around here :) If you don't hear from me for awhile, please know that it's not you,....it's me. :) Not that we're breaking up....I'll get some photos of our new little bug up here before you know it. In the meantime, ......Titus and I are lazying around....
 xoxo,
xoxo,Ariel
Tuesday, July 6, 2010
Carve your own Rubber Stamps...HOW-TO

I've been sittin', waiting, wishing.....
What else can a fully-preggers momma do in the heat of the summer and no physical energy? Why not carve some stamps? I took some printmaking classes during my time at Purdue, and have been dying to try these handmade rubber stamps. Want to try it too? Here's some help:
You'll need:
- Mastercarve block
- blank scrap paper
- soft-lead pencil
- Speedball hand-carving tool with tips sizes #1 and #2
- stamp pad and/or markers
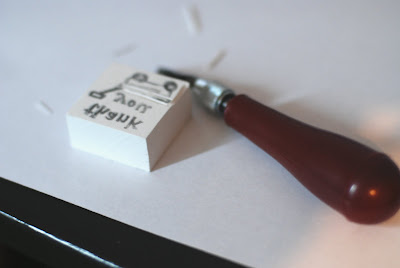
Start with a Mastercarve carving block in your size of choice. I found mine (approx. 1.5" square) at United Art and Education stores. 
Trace the outline of your carving block onto a piece of paper, to give you an idea of how large your design can be. Using a soft-lead pencil, draw your stamp design within the outline.


When you've rubbed the back of the drawing on top of your carving block, it should transfer like this...(any words will now be in mirror image)

The next step takes some practice...Use your carving tool to outline the design and carve away the excess rubber.
Try stamping it a few times to see which areas need to be carved further...
Did you also know that you can color the stamp by hand with markers?

 What's the next step? Make some handmade cards or use fabric ink to hand-stamp some linen!
What's the next step? Make some handmade cards or use fabric ink to hand-stamp some linen!Enjoy!
Subscribe to:
Posts (Atom)